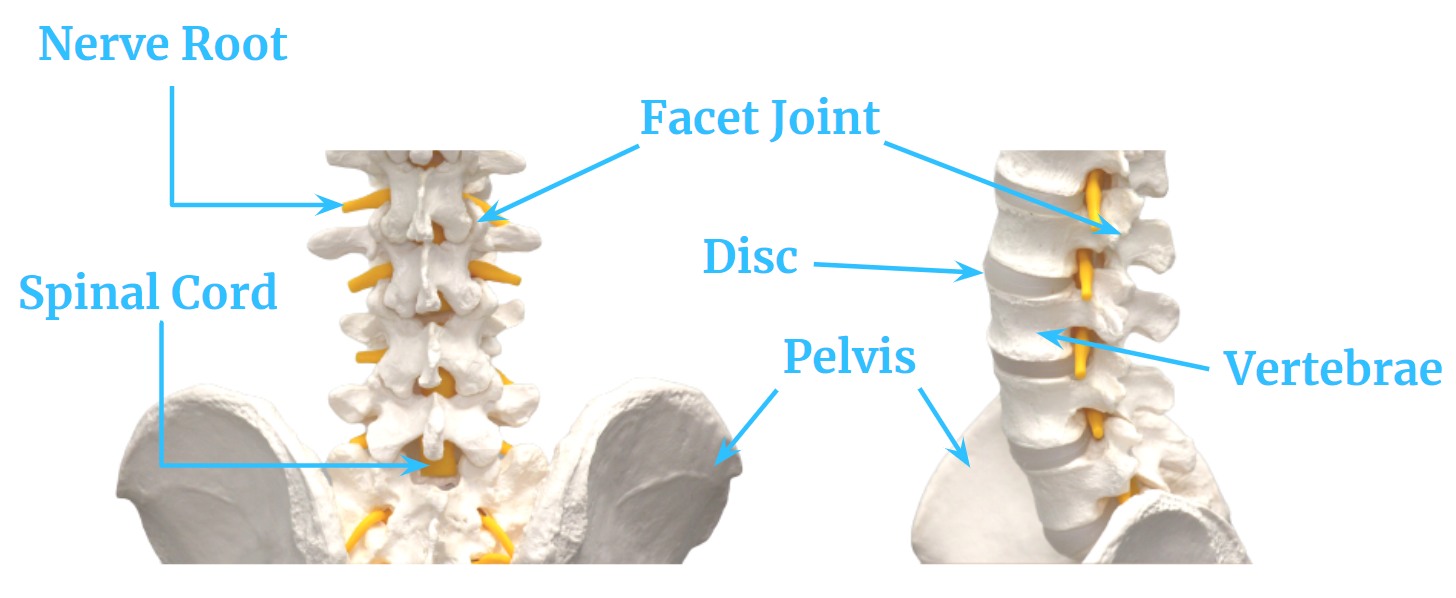
A certain amount of space is needed between your vertebrae (the bones of your spine) in order for your back to move freely. If there is not enough space, excessive pressure may be put on pain-sensitive structures including the nerves of the spinal cord. When nerves become irritated, you may not just feel pain in your back but also along the path of the nerve as it travels into your leg.
Based on your answers to the quiz, it sounds as though you are experiencing a narrowing of your spine and a corresponding irritation of a nerve.
It is important to understand that this narrowing does not mean your spine is “permanently damaged”. Rather your back has entered a temporarily agitated state and just needs the right conditions to return to being pain-free.
The motion of bending the spine forward is known as “flexion”. The motion of bending backward is known as “extension”.
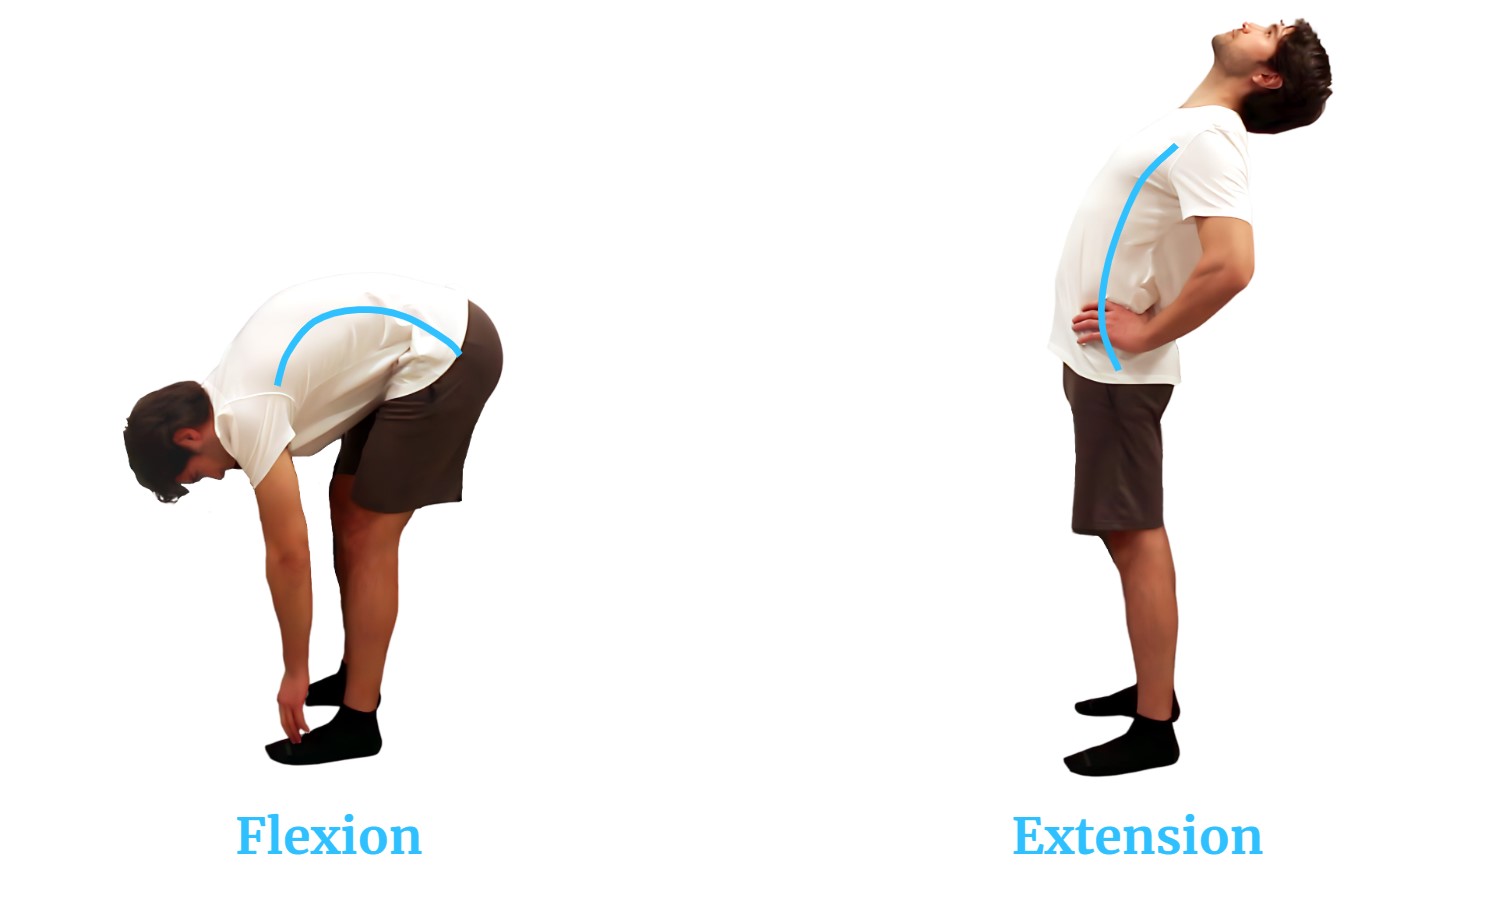
When you move into flexion, the spaces between the vertebrae increase. When you move into extension, the spaces between the vertebrae narrow.
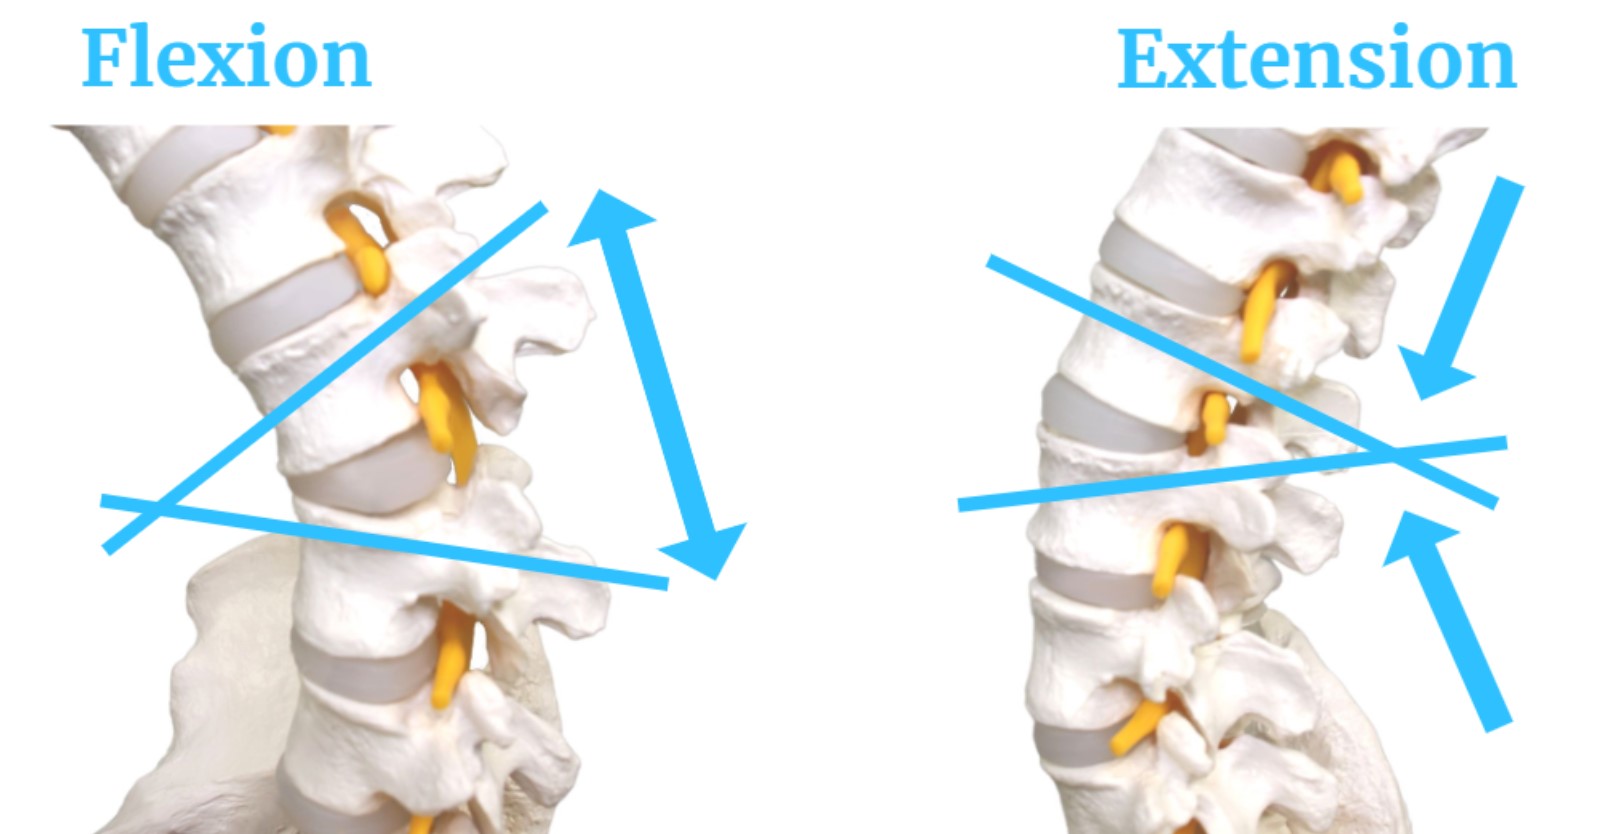
This means in order to overcome your back pain you need to focus on motions and activities that promote flexion and opening of the spine. Your exercise program and other recommendations are based on this principle.
![]()
Volume refers to how much of each individual exercise you should perform in a single session. Volume is measured in “repetitions” or “time”. If an exercise is measured in repetitions you repeat the movement that many times. If an exercise is measured in time, you hold the position for that amount of time.
Repetitions and time are given in “sets”. A set can be thought of as a group of repetitions. A set of repetitions should always be separated by a short break. We recommend starting with breaks that are 30-60 seconds long.
So for example, if you are doing 2 sets of 10 repetitions, you perform the exercise 10 times, rest for 1 minute, and then do another 10 repetitions for a total of 20 repetitions
![]()
Frequency refers to how many times you should complete an exercise at the recommended volume in a given amount of time. For example, you may be asked to perform the exercise at a frequency of 2 times per day, once in the morning and once before bed. If the recommended volume for this exercise was 2 sets of 10, you would do 2 sets of 10 in the morning and another 2 sets of 10 before bed.
![]()
Intensity describes what you should feel during an exercise. During some exercises you should feel your muscles get tired, in others you should feel more of a stretch. The intensity will help you know when you are doing the exercise right and how much you should be pushing yourself.
![]()
Before you are active or attempt an exercise you should ask yourself: “On a scale of 1-10, how much discomfort do I feel?”
A score of 10 means you are experiencing the most discomfort you can imagine and a score of 1 means you are experiencing very little discomfort. There is no right or wrong answer to this question, what 10/10 discomfort feels like is totally up to you.
The answer to this question will help you determine if you should be doing less, or doing more of the activity/ exercise in question.

Exercise and activity should not increase pain and or discomfort by more than 2 points. This increase should also not last longer than 1 minute after completing an exercise.
If your pain increases by more than 1-2 points and/ or lasts longer than 1 minute following the exercise or activity, you have pushed too far.
If you experience an increase in pain of more than 2 points or if the increase lasts longer than a minute you should rest or attempt an exercise you know makes your back pain feel better.
Once your pain has returned to the original level you may perform this exercise again but you should modify the painful exercise by reducing the number of repetitions to avoid a similar increase in pain.
If you cannot perform more than 3 repetitions without increasing your pain, reduce the exercise intensity. Most often this will mean not moving as far in each repetition.
If you cannot find a level that feels appropriate to you after modifying the volume, and intensity stop the exercise entirely and focus on the ones you can do. Avoid the exercise for 1 week, then attempt to reintroduce the painful exercise gradually still following the rules above.
![]()
If you get relief from your pain with one of the exercises, feel free to perform that exercise as many times a day with as much or as little rest in between as you see fit. It is very hard to “overdo it” with such an exercise, but if at some point an exercise that once felt good becomes painful, return to doing an amount that felt good.
If you are able to perform an exercise with ease at the recommended amount, you should attempt to advance to the second level of that exercise. But be sure to wait at least 24 hours before making any changes. Your pain may not increase until some time after an exercise is complete.
If you get to the third level of the exercise and still find it to be easy, you should increase the volume of this exercise by doing more repetitions or sets. If you are performing more than 20 repetitions or holding a position for longer than 2 minutes and you still do not feel like you are being challenged, you should now increase the frequency.
If you increase the volume and frequency at the hardest level of an exercise and still don’t find the exercise challenging, you should continue to perform that exercise at the highest level you have the time and energy for as it will still be beneficial. However, focus on the exercises and activities that you find most helpful.
In this section, you will find the exercises that have been specifically selected to treat your back pain.
We have recommended 4 different exercises for you. Each exercise comes with a text description of the proper technique, as well as a picture and video demonstration. To view the video demonstration, simply click the picture of the exercise and a new tab will open. You can switch between difficulty levels by clicking the buttons above the included picture. The recommended Frequency, Volume, and Intensity will be provided below each exercise.
Do not attempt the exercises before understanding section 2.

Click the “Show More” button below to reveal your exercise program:
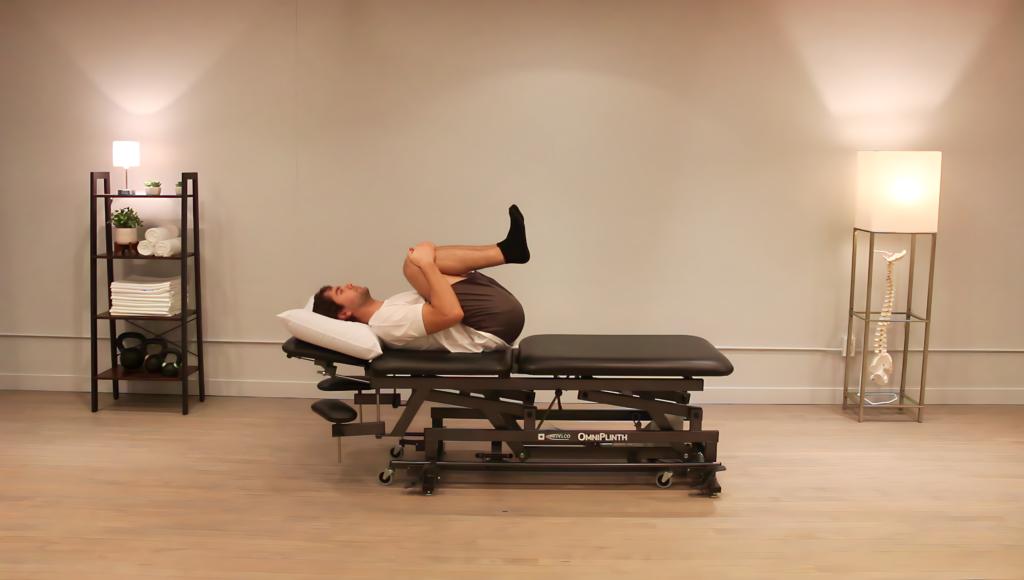
Single Knee-to-Chest
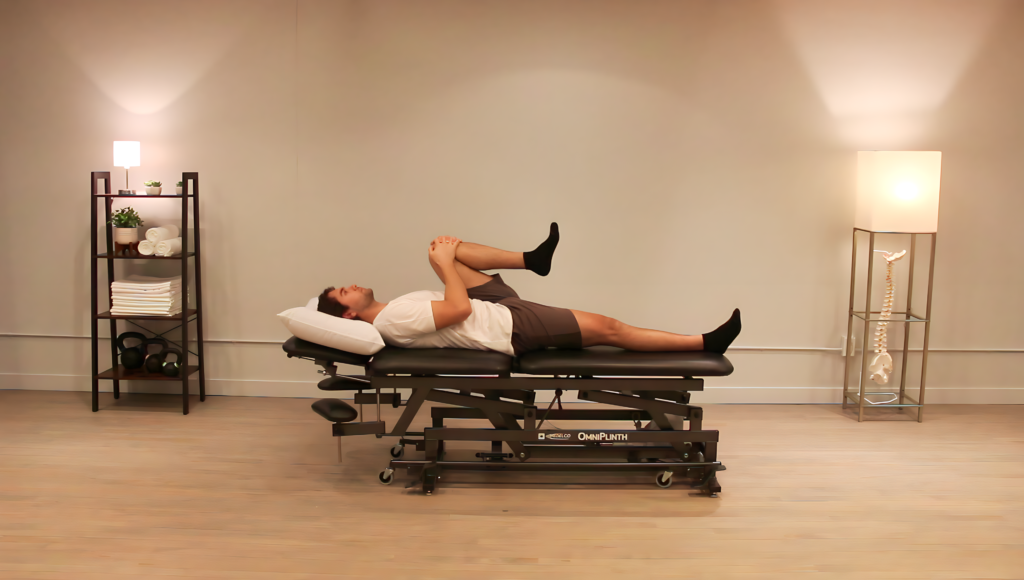
Exercise Description: To perform the “Single Knee-to-Chest” exercise, begin by lying face up on a comfortable surface, this might be your bed or a yoga mat on the floor, whatever works best for you. Slowly bring the knee on your painful side towards your chest. Once it is within reach, use your hands to help lift your leg and pull it closer to your chest. Hold this position for the recommended time or the amount of time you have determined to be optimal. If both sides of your back are painful, repeat the exercises on the other side.
- Frequency: 2-3 Times per day
- Volume: 3 sets of 30 seconds
- Intensity: You should feel a comfortable stretch in the butt muscle of the leg you are lifting and perhaps a light stretch in your low back. You may feel a slight stretch in the other hip as well. Do not push past pain, if the stretch hurts lower your leg until it is comfortable.
Double Knee-to-Chest
Exercise Description: To perform the “Double Knee-to-Chest” exercise, lie down face up on a comfortable surface, this might be your bed or a yoga mat on the floor, whatever works best for you. Slowly bring both of your knees towards your chest. Once they are in reach, use your hands to help lift your legs and pull them in closer to your chest. Hold this position for the recommended time or the amount of time you have determined to be optimal.
- Frequency: 2-3 Times per day
- Volume: 3 sets of 30 seconds
- Intensity: You should feel a comfortable stretch in your lower back, you may also feel a little stretch in your butt muscles. Do not push past pain, if the stretch hurts lower your legs until it is comfortable.
Child’s Pose
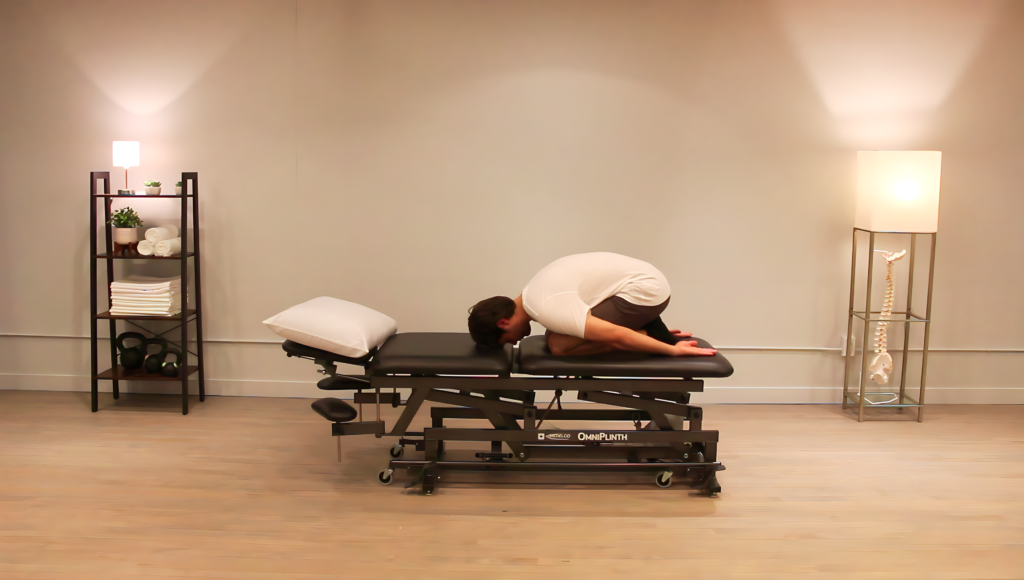 Exercise Description: To perform the “Child’s Pose” exercise, begin on all fours with your hands and knees on a comfortable surface, this might be your bed or a yoga mat on the floor, whatever works best for you. Slowly bring your hips backward until your butt makes contact with your heels. Let your chest drop towards the floor and walk your arms out in front of you until you can no longer go any further. Hold this position for the recommended time or the amount of time you have determined to be optimal.
- Frequency: 2-3 Times per day
- Volume: 3 sets of 30 seconds
- Intensity: You should feel a comfortable stretch in your lower back and butt muscles. Do not push past pain, if the stretch hurts do not sit as far back onto your heels.
Transverse Abdominis Activation
 Exercise Description: To perform the “Transverse Abdominis Activation” exercise begin by lying face up on a comfortable surface, this might be your bed or a yoga mat on the floor, whatever works best for you. Squeeze your stomach muscles in a way that causes your lower back to flatten against the surface you are laying on. It may be helpful to think about pulling your belly button towards your spine or to think about bracing your stomach for impact. Practice holding this contraction while still taking normal, controlled, breaths. Once you feel you can do this well, raise your arms overhead. Raising your arms will make holding this contraction a little harder. Do not allow your core to relax as you raise your arms. Hold your arms overhead for the recommended time or the amount of time you have determined to be optimal.
- Frequency: 1 Time per day
- Volume: 3 sets of 30 seconds
- Intensity: This exercise should cause your core muscles to “tighten”. It should take a fair amount of effort to maintain this tightness as you raise your arm but it should not be painful.
Dead Bug
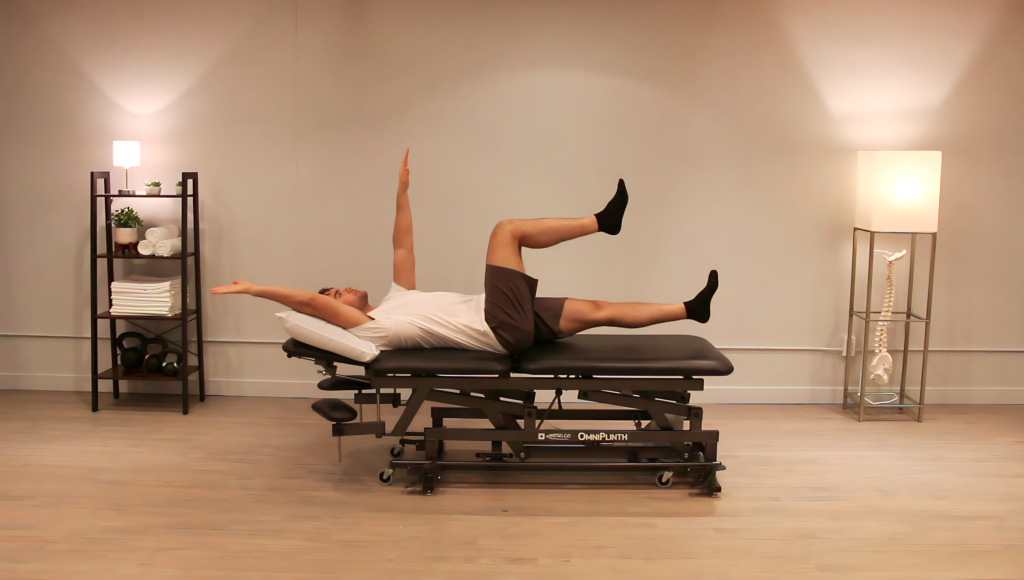
Exercise Description: To perform the “Dead Bug” exercise begin by lying face up on a comfortable surface, this might be your bed or a yoga mat on the floor, whatever works best for you. Squeeze your stomach muscles in a way that causes your lower back to flatten against the surface you are laying on. It may be helpful to think about pulling your belly button towards your spine or to think about bracing your stomach for impact. Raise your arms and legs so that your arms are straight out in front of you and your knees and hips are both bent to 90 degrees. While holding the contraction of your stomach muscles, straighten one leg and raise the opposite arm over your head, hold this position for 3 seconds, then return to the starting position. Make sure to take normal controlled breaths throughout the exercise. Repeat this motion the recommended amount of times or for the number of repetitions you have determined to be optimal.
- Frequency: 1 Time per day
- Volume: 3 sets of 30 seconds
- Intensity: This exercise should cause your core muscles to “tighten”. It should take a fair amount of effort to maintain this tightness as you move your arms and legs but it should not be painful.
Plank
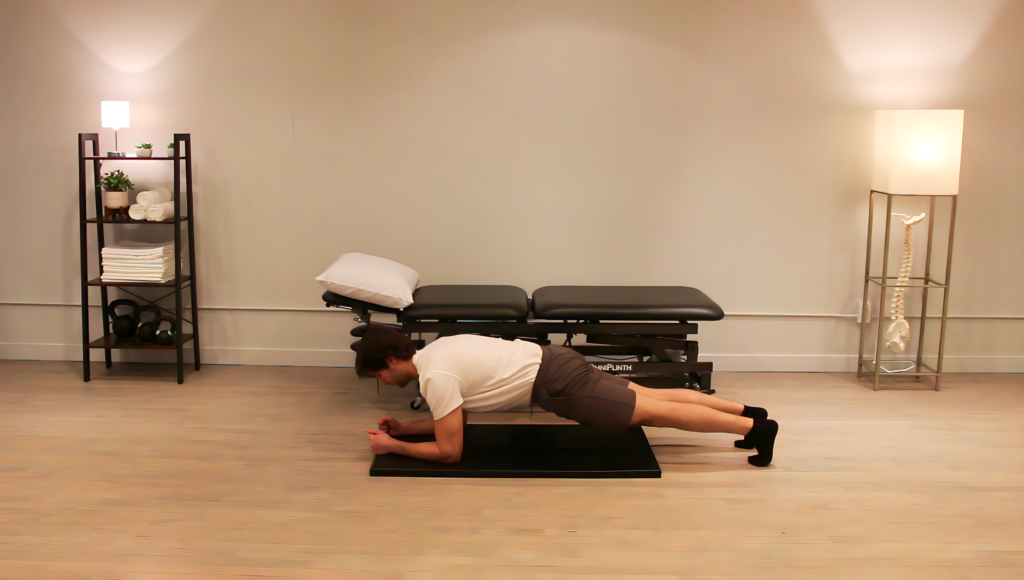 Exercise Description: To perform the “Plank” exercise, begin on a soft but firm surface like a yoga mat or carpeted floor. Prop yourself up onto your forearms with your elbows bent to 90 degrees. Lift your hips off the ground until your spine is in a neutral position. Be mindful to not let your back round in either direction. Hold this position for the recommended time or the amount of time you have determined to be optimal.
- Frequency: 1 Time per day
- Volume: 3 sets of 15-30 seconds
- Intensity: This exercise should cause your core muscles to “tighten”. It should take a substantial amount of effort to maintain this tightness without letting your back round but it should not be painful.
Seated Sciatic Floss
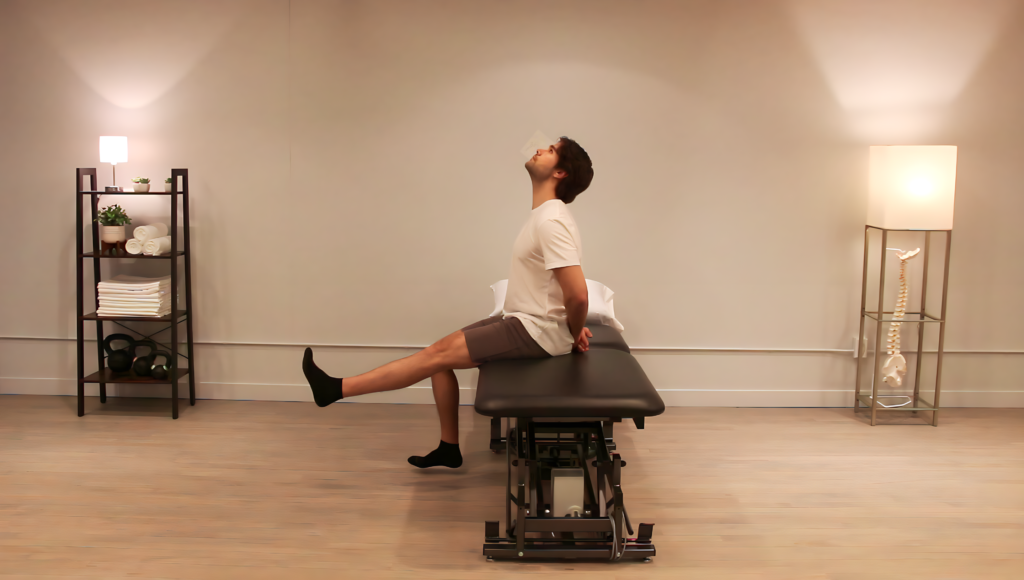
Exercise Description: To perform the “Seated Floss” exercise, sit in a chair, clasp your hands behind you, and round your back. Slowly straighten the knee of the affected leg and pull your toes upwards. As you straighten your leg, raise your head and sit up straight. Time these movements so that once you are sitting upright, your leg is also straight or as high as it can go without triggering pain. You should feel a stretch in the back of your leg. Hold for 3 seconds and then return to the starting position. Perform this motion for the recommended amount of repetitions or as many times as you have determined to be optimal.
- Frequency: 1 Time per day
- Volume: 2 sets of 8 repetitions
- Intensity: This exercise should create some tension in the back of your leg and possibly a pulling sensation in your low back/ buttock area. This pulling sensation should be gentle and not cross the line into pain. It should also not be strenuous.
Straight Leg Raise

Exercise Description: To perform the “Straight Leg Raise” exercise begin by lying face up on a comfortable surface, this might be your bed or a yoga mat on the floor, whatever works best for you. Keeping your knee as straight as possible, lift the affected leg off the ground. As you do, pull your toes towards you. Hold this position for 3 seconds, then return to the starting position. You should bring the leg high enough that you feel a stretch in the back of your leg, but not so high up that it becomes painful. Perform this motion for the recommended amount of repetitions or as many times as you have determined to be optimal.
- Frequency: 1 Time per day
- Volume: 2 sets of 8 repetitions
- Intensity: This exercise should create some tension in the back of your leg and possibly a pulling sensation in your low back/ buttock area. This pulling sensation should be moderately intense but it should not cross the line into pain. It should also not be strenuous.
Seated Sciatic Tensioner
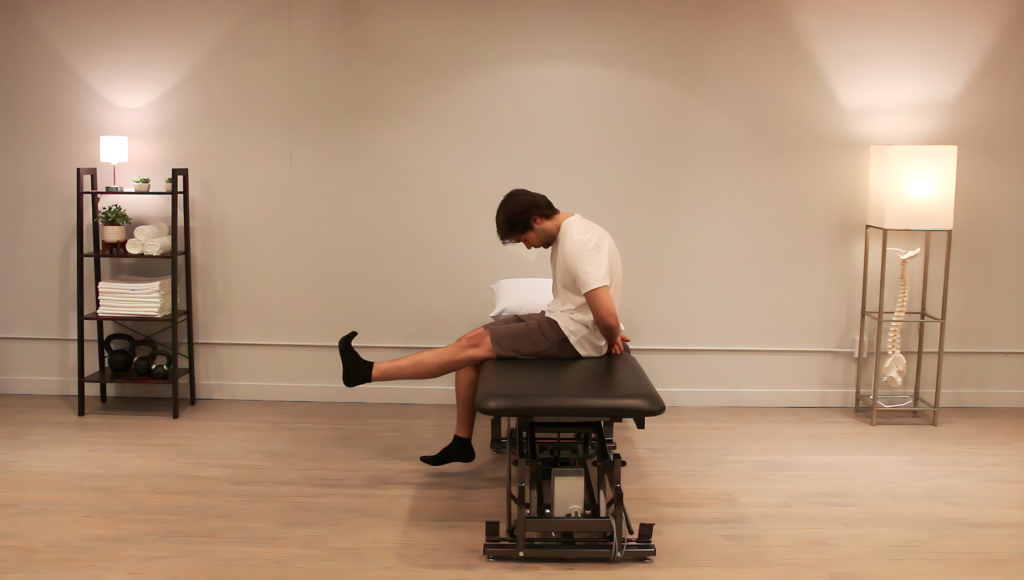
Exercise Description: To perform the “Seated Tensioner” exercise sit in a chair, clasp your hands behind you and sit tall and upright. Slowly straighten the knee of the affected leg and pull your toes upwards. As you straighten your leg, lower your head and round your back. Time these movements so that once you are sitting slouched, your leg is also straight or as high as it can go without triggering pain. You should feel a stretch in the back of your leg. Hold for 3 seconds and then return to the starting position. Perform this motion for the recommended amount of repetitions or as many times as you have determined to be optimal.
- Frequency: 1 Time per day
- Volume: 2 sets of 8 repetitions
- Intensity: This exercise should create some tension in the back of your leg and possibly a pulling sensation in your low back/ buttock area. This pulling sensation should be moderately intense but it should not cross the line into pain. It should also not be strenuous.
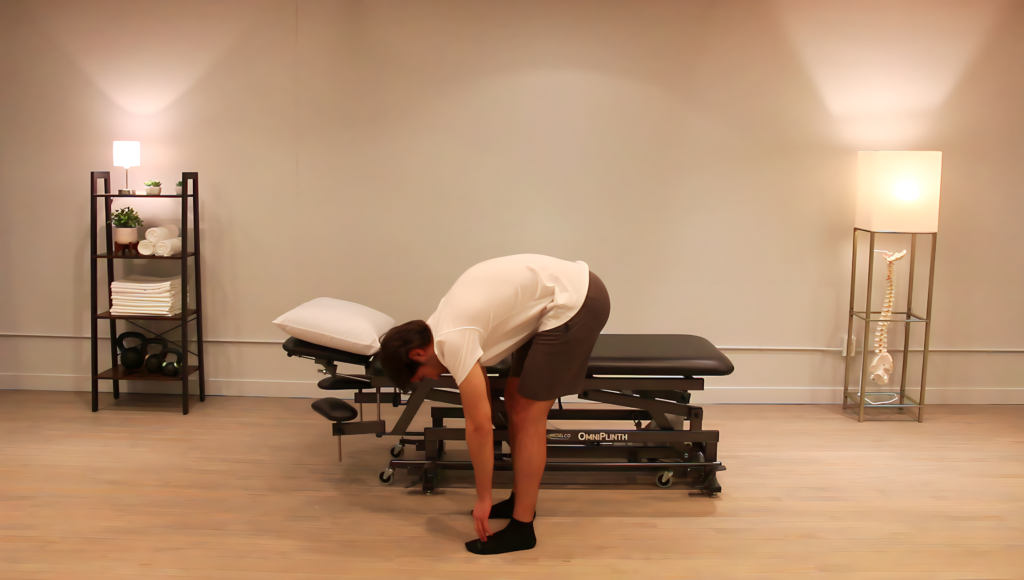
Seated Flexion
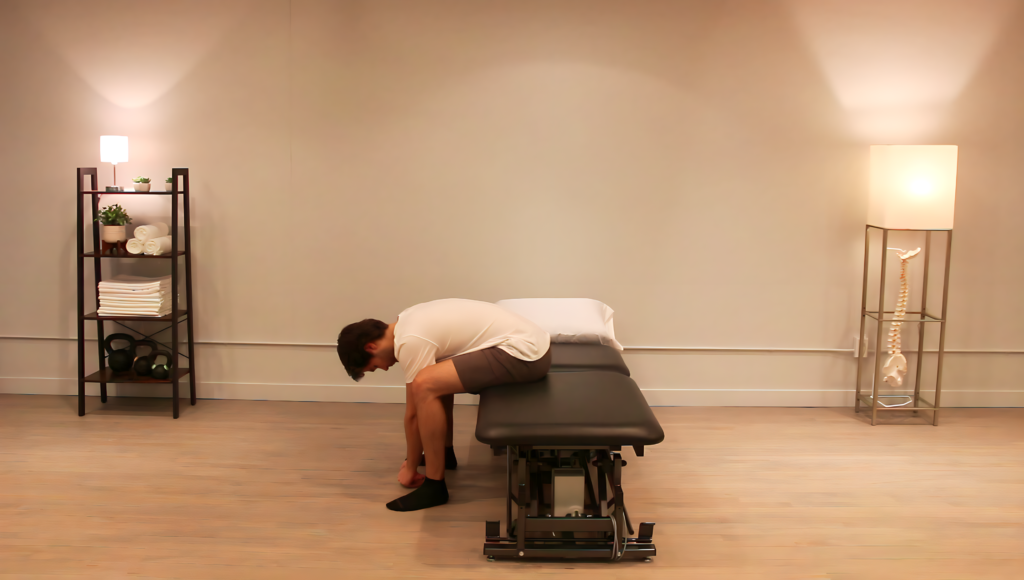
Exercise Description: To perform the “Seated Flexion” exercise, sit with your feet slightly further than shoulder-width apart. Bend forward at your hips slightly rounding your back. Reach towards the ground as far as you can comfortably. Hold this position for the recommended time or the amount of time you have determined to be optimal.
- Frequency: 2-3 Times per day
- Volume: 3 sets of 30 seconds
- Intensity: You should feel a comfortable stretch in your lower back, you may also feel a little stretch in your butt muscles. Do not push past pain, if the stretch hurts do not reach as far towards the ground until it is comfortable.
Hip Hinge
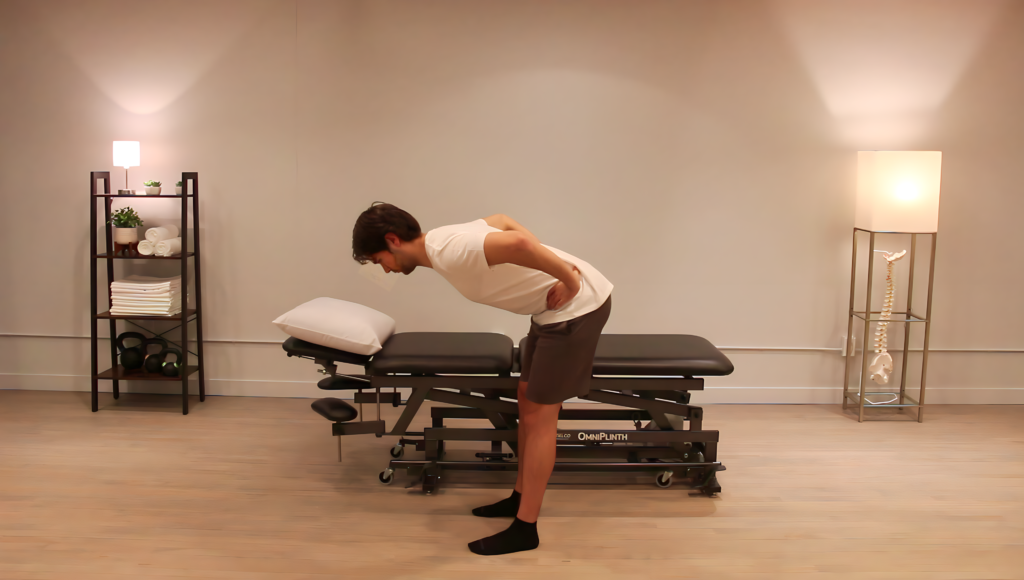
Exercise Description: To perform the “Hip Hinge” exercise, begin in a standing position with your feet shoulder-width apart and your hands on your hips. Begin to lean forward by bending at your hips keeping your back in a “neutral” (as straight as possible) position. As you lean forward you should have a slight bend in your knees. Perform this motion for the recommended amount of repetitions or as many times as you have determined to be optimal.
- Frequency: 2-3 Times per day
- Volume: 3 sets of 30 seconds
- Intensity: You should feel a comfortable stretch in your lower back and legs, you may also feel a little stretch in your butt muscles. Do not push past pain, if the stretch hurts do not bend as far.
Standing Flexion
Exercise Description: To perform the “Standing Flexion” exercise, stand with your feet shoulder-width apart. Keeping your knees straight bend at your hips and round your back bringing your hands towards your toes. Hold this position for the recommended time or the amount of time you have determined to be optimal.
- Frequency: 2-3 Times per day
- Volume: 3 sets of 30 seconds
- Intensity: You should feel a comfortable stretch in your lower back and legs, you may also feel a little stretch in your butt muscles. Do not push past pain, if the stretch hurts do not bend as far forward.

When sitting, you should choose a seat that is soft but still supportive. A supportive chair is one designed with a backrest that conforms to the natural curve of your back and is easy to get in and out of. If you prefer a firm chair, this is fine too, a softer chair is just more likely to allow your back to rest in an open position. Regardless of the chair you use, switch positions frequently. It may even be helpful to interrupt long periods of sitting with 30 seconds or so of standing. Avoid sitting with your legs fully extended such as you might when putting your feet up on a coffee table. This position increases tension on nerves and puts additional pressure on your back.
Due to the nature of your back pain, standing and walking may at times be difficult and you may need to rest more often than you normally would. This does not mean you should avoid walking and standing entirely, the more you are able to do pain-free the better. When walking, try taking shorter steps to limit the amount of extension your spine experiences. When standing, engage your core and tilt your pelvis upward. This will help take your back out of extension and make standing a little easier.
![]()
The best sleeping position for you will likely be on your back with pillows under your knees so they remain bent. This position will keep your back out of extension. Sleeping on your side is okay too if you prefer to do so, but you should place a pillow between your legs and another between your hip and shoulder to help support your spine. Avoid sleeping on your stomach, as it places your back into extension. You may also want to try some of your exercises right before bed to help you sleep pain-free.
![]()
In the early stages of recovery, avoid lifting heavy objects. But, if you must, follow these steps:
1. Stand close to the object, position your feet shoulder-width apart.
2. Squat down and keep your back straight and your chest up.
3. Tighten your core muscles, and use your legs to lift the object, keeping it close to your body.
Don’t twist your back as you lift. Instead, pivot your feet and turn your entire body. If possible avoid lifting overhead until your back pain has subsided as reaching overhead brings your back into extension.

Some of the exercises we provided may have an immediate pain-relieving effect. These exercises can be done multiple times a day as a way to control pain when you need it. Motion can have a therapeutic effect through many avenues including increasing blood flow, releasing endorphins, and promoting relaxation. To avoid “overdoing it” listen to your body, if something feels good do more of it, if it hurts do less.
![]()
Ice and heat can also help control pain. Both can be useful, but if you’re unsure, try using heat for stiff muscles and ice for sharp, acute pain. You can use both in combination, starting with ice and finishing with heat. Use each for 15-20 minutes at a time, and monitor your skin temperature to avoid burns or frostbite. Typically, you should place ice or heat directly over a sore area with a layer of cloth separating your skin from the ice or heat pack. You may also find benefit from icing and heating the surrounding areas.
![]()
There are many different types of medications used in the treatment of back pain. Some of these can be obtained over-the-counter and others will require a prescription. If this is something that interests you, a conversation with your doctor or pharmacist is a good way to determine the pharmaceutical treatment options for you. Keep in mind that medication is not necessary and is rarely enough on its own to stop back pain. Instead, when appropriate, it should be used in addition to a more comprehensive program such as this one.
![]()
Finding things that provide you with temporary relief is a very normal way to get through the day. Some ways to find temporary relief include TENS (Transcutaneous Electrical Nerve Stimulation) machines and self-massage.
TENS machines use electric current to provide temporary relief by “overriding” the pain signals sent to your back. The pads and intensity should be adjusted to the instructions of your individual machine.
Massage can help loosen your back and relieve stiffness. There are many at-home massage solutions, including electric massagers and foam rollers. Electric massagers are highly adjustable to fit your needs, however, they can be expensive. Foam rollers are a cheaper option but maybe a little more intense. A massage should feel strong but comfortable, you do not get more benefit from pushing as hard as you can.
Please also keep in mind that fancy gadgets are not necessary in the treatment of back pain and you can get better without them. But if you have the means to access them, they can be a helpful adjunct to a more comprehensive program.
In this section, you will learn about the “Pain Cycle” and what you can do to disrupt it.
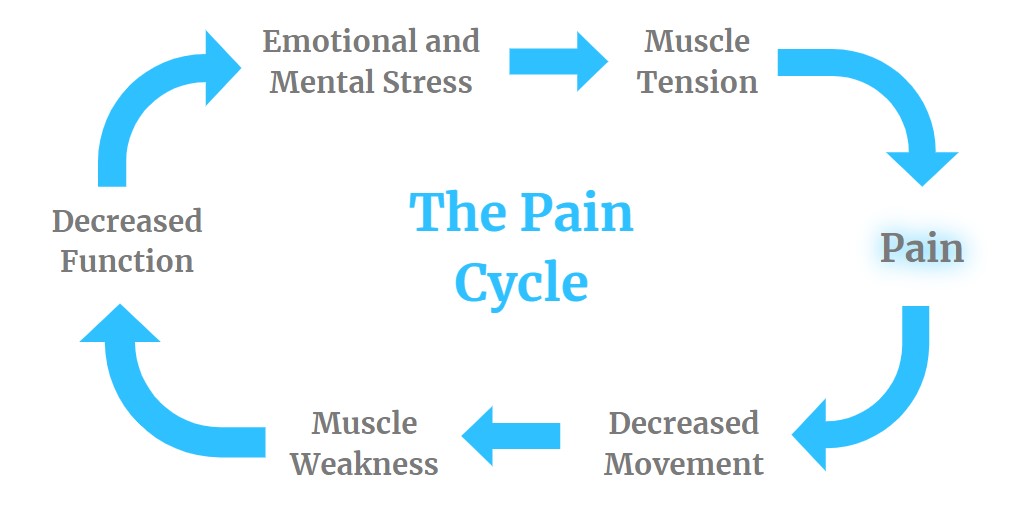
Click the “Show More” button below to reveal 3 strategies you can use to break out of the pain cycle.
![]()
With practice, a body scan can help you release muscle tension, promote relaxation, and reduce back pain by fostering a sense of self-care and deepening your mind-body connection. The point of a body scan is not necessarily to change how you feel immediately, but rather to help you understand your body’s needs.
To perform a body scan:
- Begin by finding a comfortable position. This can be standing, sitting, or laying down.
- Close your eyes and take deep controlled breaths.
- Direct your attention towards your head. Become aware of any tension, pain, or stress, you might be holding in this area. As you exhale, imagine this tension and stress leaving with your breath.
- Slowly shift your attention to your ears, then face, then neck, then shoulders, and so on working your way downwards. At each stop acknowledge any tension, pain, or stress.
- Pay extra attention to your back and problem areas. What exactly do you feel physically? How do these sensations make you feel emotionally? Take a moment to recognize that your physical sensations do not have to dictate your mood, acknowledge the sensations without judgment and breathe through them.
You should find that after a body scan, you feel more control over your emotions and you should feel a restored sense of control over your body.

Breathing is a unique aspect of our physiology as it bridges the gap between our conscious and subconscious minds. With ease, you can switch between breathing automatically and actively controlling your breath. We can take advantage of this connection and use our breath to consciously have an effect on our autonomic nervous system. Our autonomic nervous system plays a big part in regulating anxiety, muscular tension, and pain perception. Below you will find two breathing techniques you can use to have a positive effect on your autonomic nervous system:
Technique #1: The Physiological Sigh
- Inhale maximally through your nose.
- Once your lungs are full, hold your breath for 1 second and then, without exhaling, take another quick sharp inhale to fill your lungs even further.
- Slowly release this air through your mouth without forcing it.
You should feel a sense of immediate calm and relaxation after performing this breathing technique.
Technique #2: Box Breathing
- Inhale through your nose for 4 seconds.
- Hold your breath for another 4 seconds.
- Exhale for another count of 4 seconds.
Repeat this cycle as needed until you feel begin to feel a sense of calm and relaxation.
![]()
Back pain has likely decreased your ability to participate in activities that you find enjoyable. Before you are able to do these things again without any pain, it is important to find modified ways you can participate in things you enjoy without triggering pain. When you participate in activities that bring you joy, your body releases endorphins, which act as natural pain relievers. Additionally, doing things you love helps distract your mind from the pain, reducing its intensity and allowing you to remain more active.
Understandably, it can be difficult to prioritize activities we enjoy and we might be discouraged if we cannot do them to the full extent we want. But playing with your kids, going on walks, riding a bike, or doing whatever else it might be that brings you joy in whatever capacity you can manage will promote relaxation, improve your mood, and over time will help you experience an increase in function.
Limiting yourself to complete rest and avoiding any sort of movement or activity is more likely to increase your time of recovery than to shorten it.
If you ever have any questions about your program or anything else related to our website, please don’t hesitate to reach out. Additionally, If you would like to share some feedback or your personal story we would also be happy to hear from you. You can reach us by clicking here.
And Remember: